Table of Contents
Hey all, I just picked up a Raspberry Pi 4 Model B, and finding this information wasn’t easy. I wasn’t able to have any success with StackOverflow or anything of the sort either. So here’s what you need to do. I used the image of Raspbian located at this link.
Without SSH access
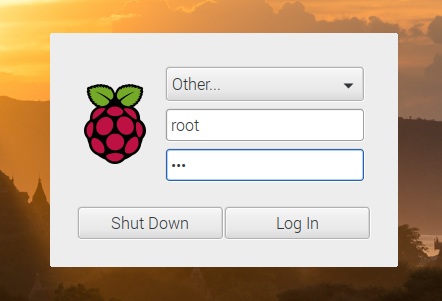
If you don’t have SSH access, you can simply plugin your display adapters, keyboard and mouse, and spawn a shell. The icon can be found in the top left of your screen if following this guide with a fresh install of Raspbian.

Now that you have a shell open, enter the following command to change the root password for root:
sudo passwd root
Now that you have set the root password for root, you can now logout and login as root (not very graceful, but gets the job done):
killall -KILL -u piSelect the username box, and select “Other” typing root as the username, and the password with whatever password you provided in the previous step.
Now you can issue the following command, changing the NEW_USERNAME with whatever username you deem fit:
killall -KILL -u pi; usermod -l NEW_USERNAME -d /home/NEW_USERNAME -m piAfter issuing these commands, you can now set the password for your username:
passwd NEW_USERNAMEAfter doing so, you can now reboot, and sign in with your new username and password.
With/enabling SSH access to your Pi
First, I didn’t have any display adapters that were compatible with this Pi. So I had to SSH into it. To enable being able to SSH into your pi, take the Micro SD card that you’ve flashed with the latest version of Raspbian, and navigate to the root folder. Make sure you have Hidden items and Item check boxes enabled in your file explorer. These two options can be seen highlighted below.

Then create a file named ssh in this root directory. Make sure that it doesn’t have any file extensions such as .txt, or .png.
Now that you’ve enabled SSH for your Raspberry Pi, take the Micro SD card, and plug it into your Pi, and power it up, plugged into ethernet. Now you need to find the IP address of your Pi. For this step, I just logged into my Router’s web interface, and found the IP address based on it’s hostname: raspberrypi.
For SSHing into your Pi, you can follow the following command:
ssh pi@<your-pi-ip-here>You will then be prompted for the password, which is by default:
raspberryGo ahead and hit enter. You should now be greeted with the command line of your Pi.
Getting root user access
Now that we have access to our Pi, we need to switch to the root user. This will allow us to run elevated commands. You can issue the following command to switch your current user to root:
For this command, you can use vi / vim / nano, whatever tool you would like. I used vi in this instance:
sudo vi /etc/ssh/sshd_configYou will then need to change the following line in the file sshd_config.
PermitRootLogin yes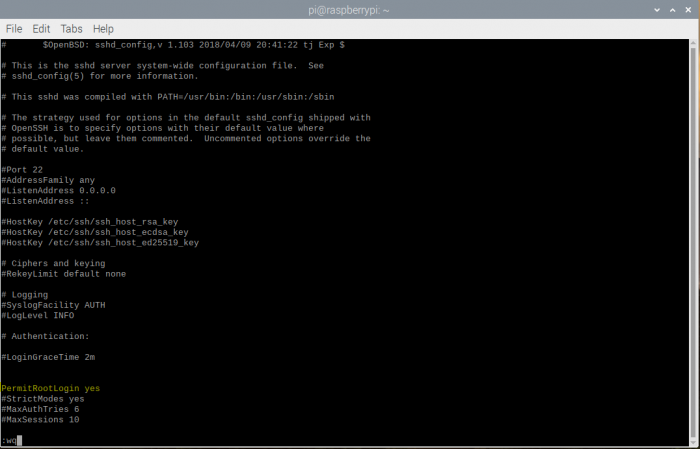
Now that you have changed these settings, now you will need to restart the SSH process:
systemctl restart sshNow you need to set a password for the root user, through the following command:
sudo passwd rootAfter entering the new password, exit your current SSH session, returning back to your host system. You will now need to SSH into your Pi as root.
ssh root@<your-pi-ip-here>Changing to new username
Now that we are root, we just need to kill all the user’s processes, and rename the user. To do this, we can chain the two commands together, like such:
killall -KILL -u pi && usermod -l NEW_USERNAME -d /home/NEW_USERNAME -m pi
After executing these commands, you should then change your password from default through the following command as root:
passwd NEW_USERNAMEAfter doing so, you can exit out the root SSH session, and login through SSH with your new username and password:
ssh NEW_USERNAME@<your-pi-ip-here>